Ok so I promised a tutorial so here it is. I am going to show you how I made Cinderella hair bow. It is a little tedious if you haven't worked with ribbon before and believe me it is mostly trial and error. This was about the 5th or 6th one I did of the princess ones so I did find out a few things that HELP a ton when it comes to getting it perfect. And I will try and make sure to share them with you as I go through the pictures. So I guess here we go. Ooo and by the way once you do one princess it is easy to figure out the rest, the basics are the same its just the colors of the ribbon and the accents that are different for each one, but like I said its more just playing with the ribbon until you figure out what you like. OK so again here we go...
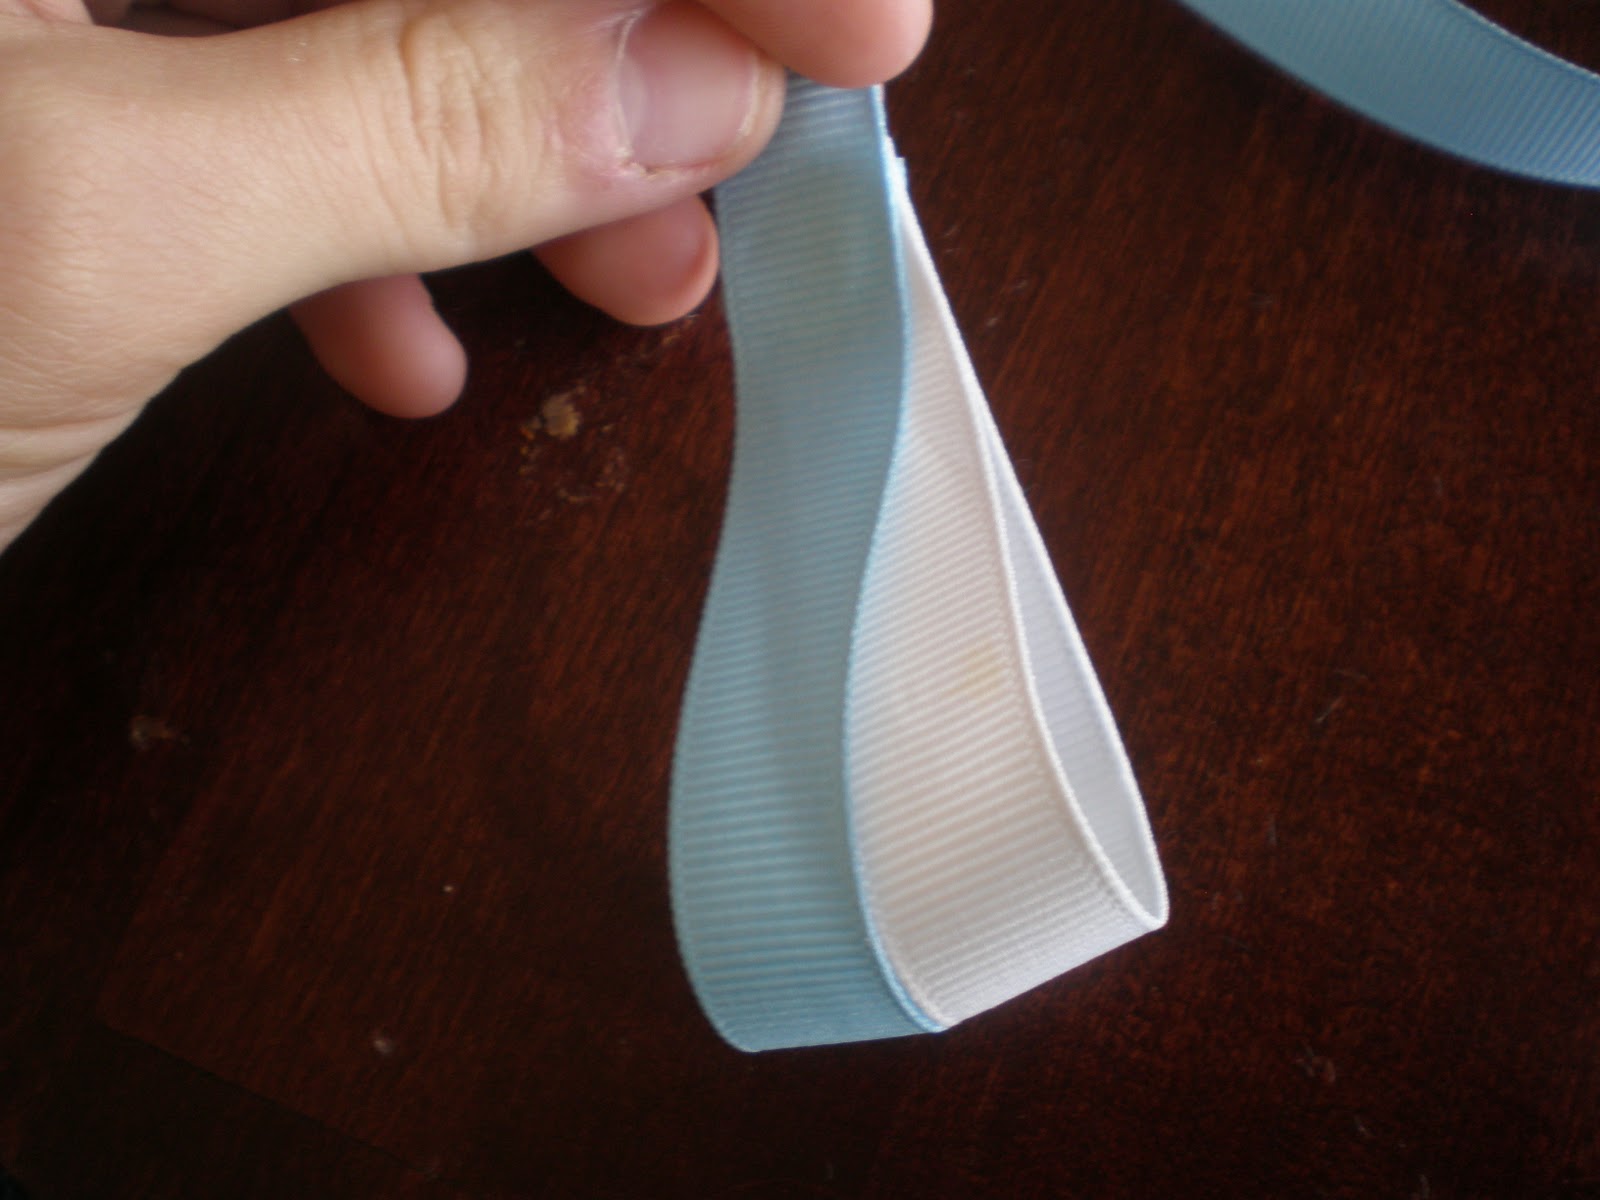
 Ribbons (note this is just the size I used its not mandatory that they are this size. Ummm but I would suggest that the blue, yellow, white ribbed, and tan are the same size. But you could skip one step by having a tan in 5/8" and also tan in like a 3/8" or 1/4" idk I just folded the 5/8" in half)
Barret I used a super small one sorry no idea what size
Small crystal gem
Scissors (relatively sharp, not little kids ones, they don't cut as well)
Candle/open flame to finish the edges of ribbons
 |
| My Ribbons |
Ok enough stuff lets get down and dirty... i mean get the instructions.NOTE: I would suggest that you burn the edge so that it doesn't fray on almost all edges, BEFORE gluing down any ribbon, however there are two steps I will tell you not to until after you glue them. Don't worry I will let you know.
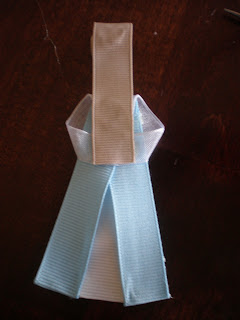
- So lets start, you need to create the head/body of your Cinderella. I made the "head" fit just around my finger. This made it so the head isn't going to be HUGE. After gluing the head then you need to cut the other end so that you have the body part as well. I would say cut about 2" to 2.5" down from the bottom of the loop. (burn edge) SO there you go see first step down.

- OK so next we are going to start to make the skirt. This part is a little harder to explain so I will try my best to explain but I hope the pictures help explain more than I feel I do lol. So start with the solid white ribbon and you are going to create a loop. You want to be careful to not make the loop too large, I think I actually did but there you go its not like anyone is going to run up rip it out of your daughter's hair and say, "This is TOO LONG!!!" yeah honestly they will just be like WOW that is completely AMAZING!!! Anyway I ended up flatting the skirt by adding a dab of glue at the inside of the loop, which is shown in like the last picture in this step. However it would be easier to do it now. That makes it easier to tell how long the skirt is going to be.


- Now get that blue ribbon, we are finishing this skirt. So glue the edge at the top of the white...umm basically you are going to do the same thing with the blue that you did with the white only this time you are gluing the blue edge on the white so it wraps around. Next you will want to flip this around and the the same thing on the other side. WOW this makes me feel like I really don't know what I'm doing... but don't worry I am telling you it is really not hard, its just hard to explain. OK so remember to glue the skirt flat, well actually that is completely up to you, but I prefer to glue it down so it lays better, again up to you.
 |
| Finished Skirt Front |
 |
| Finished Skirt Back |
- Next, grab the sheer white you are going to fold it half and glue the edge to the back top of the skirt, you want the ribbon to be going straight up from the skirt, and wrap around so it comes off the side like in the pictures. I glued it on the back so that no glue would show up but it would stay in place. Continue around the side and do the same to the other side. Finish off where you started and glue in place. NOTE this ribbon is slightly harder to glue because it is sheer so BE CAREFUL to not burn yourself. Also this ribbon is hard to make the edges not fray, it does work but it burns SOO much faster than the other ribbon so again be careful.
 |
| Front |
 |
| Back |
- Attach the body to the skirt. Umm yeah that's about it for that step... just make sure that there is a little more than 5/8" of open tan between the skirt and the head. You need to have space for the top and the choker so there you go. Its already starting to look like Cinderella.
- Arms: ok pretty simple we are making the arms. This step can be skipped if you have Tan ribbon that is half as wide as the 5/8" ribbon but if not just do this. DO NOT BURN THIS ONE FIRST Fold the ribbon in half long way or hot dog style. Cut this so it looks like a normal arm length compared to the rest of the body... lol sorry no measurements here. It was like the length of my finger if that helps. OK so than you want to round the edges and burn. And there you go... arms.
- Attach arms ok umm yeah I think the picture says it all for this one. just saying.
- Attaching Sleeves: Use the sheer white to add sleeves. Again we are going to fold it in half, and glue to back side of arm. Cut the sleeve so that it will wrap all around the arm and glue on the back. Do the same on the other arm. Yeah see we're getting through the easy stuff like nothing.
- Choker: again really simple. Do the same thing as what we did with the sleeves only used the black ribbon to create the choker on her neck. Yeah its that simple.
- Shirt: Create the shirt by folding the blue ribbon in thirds. Make it so it fits area for the shirt. And glue it on. Wow just the hair left. OOO yeah looking GOOD.
- Hair: ok so this part is going to be SUPER hard to explain so I really hope I explain this good. We are going to create her bangs, glue to the back/top of her head and then loop down to create bangs. Glue to the back of neck and then back up so that the edge is coming from the top of her head. Now before you cut the hair make sure there is going to be enough to fold over for her bun. Attach ribbon to back of head at an angle as shown. This is the tricky part, Fold over and glue on back and than fold the part that is supposed to be her bun and glue to the rest of the hair. Play with it a bit before gluing it, that will make it easier for you when you glue it. I added a dab of glue on the bangs so the wrapped part doesn't move around on you.

- Ok two more final touches of Cinderella before you attach to the barrette. Attach the small crystal to the choker pretty simple just really tiny. and add the headband, again simple same idea as what we did with the choker, and the sleeves. Check it out Cinderella!!!
- The barrette is really simple attach the color of your choice ribbon to the barrette making sure the ends were burned and tucked under. again really simple
- Ok so all that's left is attaching Cinderella to the barrette. I also took a piece of ribbon and folded it in 4ths and glued so that I could have a solid base for her. I didn't like how her neck was kinda wobbly, so I wanted for it to be more sturdy.
SO there you go that's it, a Cinderella Barret, made by YOU. lets see the comparison.
Ok SO I hope that I didn't confuse too many people with this, and hopefully my spelling didn't scare too many people off. Sorry it is my first tutorial...lol I think i might be more creative than I am of a teacher... wait did that make sense? Ok so leave me some comments let me know what you think and if there is anything I need to clear up for you. Umm Other than that... Happy Crafting


 Ok so I promised a tutorial so here it is. I am going to show you how I made Cinderella hair bow. It is a little tedious if you haven't worked with ribbon before and believe me it is mostly trial and error. This was about the 5th or 6th one I did of the princess ones so I did find out a few things that HELP a ton when it comes to getting it perfect. And I will try and make sure to share them with you as I go through the pictures. So I guess here we go. Ooo and by the way once you do one princess it is easy to figure out the rest, the basics are the same its just the colors of the ribbon and the accents that are different for each one, but like I said its more just playing with the ribbon until you figure out what you like. OK so again here we go...


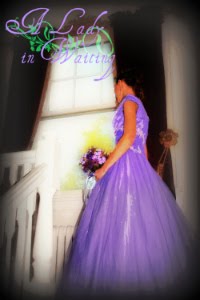
 So I decided to make a dress for Jewls so I will let the pictures tell the rest. lol